Manage the Action List in EventCX
PRESENTERS
The Action List is frequently named by EventCX users as one of their favorite features. Used effectively, it becomes the heartbeat of your operation, helping you make sure that every single thing required for a successful event is done on time.
The Action List knows about all the to-dos to be done for each type of engagement you do, when they should be done, and who should do them. For example:
-
"Send agreement to client" 1 day after the hold is placed, assigned to Bill.
-
"Book airfare" 4 weeks in advance of the event date, for confirmed events only, assigned to Mary.
-
"Signed agreement received" 2 weeks before the event date, for confirmed events, assigned to Mary.
-
"Send thank-you letter" 1 week after the event date, for confirmed events, assigned to Bill.
Each item in the Action List is triggered by a combination of:
-
Event status (HELD, CONFIRMED), e.g. certain items would apply only to HELD events, while others would apply only to CONFIRMED events.
-
Event date or date the event was entered on the calendar, e.g. "do this 4 weeks before the event starts", or "do this the day after the hold goes on the calendar".
Your EventCX account includes a default Action List, but to be effective you'll want to customize the standard list and add additional lists for different types of engagements. For instance, the Action List for a keynote is generally different than the Action List for a 2-day workshop.
How Does the Action List Let Me Know When Something Needs to Be Done?
Like all good to-do lists, the Action List will pester you when it's time to get an item done. It does this in a few ways:
-
Daily email to each staff member with at least one item due today. The daily email aggregates all of the items due today across all of your events and sends them in one email.
-
On the EventCX DASHBOARD.
-
In the "Action List" and "Action List - undone" reports
Select Which Action List Applies to the Event
Because the to-do items vary for different types of events, EventCX allows you to create separate Action Lists for each type of engagement you perform. Only one Action List at a time applies to an event. You can choose that Action List when you create the event, and you can change it any time after.
To change the Action List for an event, when looking at the ACTION LIST tab on the active event:
-
Use the drop down control above the list of items to select which of your Action Lists should apply to this event.
-
After choosing, you will be asked if you want the new item to be added to any items already on the list. You will also be given a chance to clear out any items already on the list before adding items from the new list.
Marking Items as Completed
When an item has been completed, it should be marked as such.
When looking at the ACTION LIST tab on the active event, click the CHECKBOX to the left of the item description that has been completed. Marking an item as DONE also sets the DATE to today's date, and the task OWNER to the name of the user marking it done.
Note that the DATE on an item has two meanings: while the item is not done, the date is the due date. When the item is marked as done, the date indicates the date it was completed.
Removing an Item on the List
Occasionally, an item from your Action List will not apply to a particular event. You can delete individual items from an event's list.
When looking at the ACTION LIST tab on the active event, click the X control on the right side of the item you want to remove. Click the DELETE button that appears to confirm removal, or click CANCEL to keep the item.
Adding a One-off Item for an Event
If you've invested the time to configure your Master Lists carefully, applying that list to an event will usually have every to-do item needed. However, exceptions may require you to add an unusual to-do item to a specific event.
When looking at the ACTION LIST tab on the active event:
-
Find the entry fields below the list of existing items.
-
Type in a description of the item in the ADD NEW ACTION field.
-
Set the item's due date in the DUE ON field.
-
Select the staff member responsible in the ASSIGNED TO field.
-
Click the ADD button to add the new item to the event's list.
If you find yourself adding the same one-off frequently, consider adding it to the Master List for that type of event.
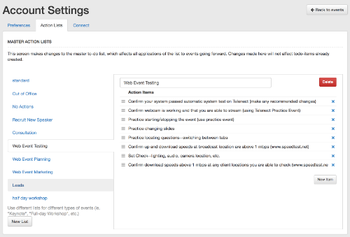
Customize Your Master Action Lists
Your EventCX account comes with a default Action List, but the full potential of Action Lists is unlocked when you customize your list(s) to match they way your office does business.
You can create several Action Lists to accomodate different types of engagements. For instance, your list of to-dos for a webinar is probably quite different than your list for a keynote.
To Create a New Master Action List for a Specific Type of Engagement:
-
Use the USER MENU (your login in the upper-right) and choose SETTINGS.
-
Click the ACTION LIST tab.
-
Click the NEW LIST button to create a new list.
-
Type the name of the list ("keynote", "webinar", etc) into the LIST NAME field and click ADD.
-
Find your new Action List in the list of names along the left side of the screen and click it.
-
With your new (empty) list selected, click the NEW ITEM button to the right to add your first action item to the new list.
- Fill out the Action List Item form:
-
ITEM DESCRIPTION: enter a short description of the task ("book travel", "received contract", etc)
-
WHEN THIS ITEM APPLIES: select from the list of event statuses. If you choose, for instance "when the event is confirmed", this item will be applied automatically to events created in the confirmed status, or to existing events whose status is changed to confirmed.
-
WHEN THE ITEM IS NORMALLY DUE: enter a number of days, and then choose how those days relate to the event:
-
BEFORE THE EVENT STARTS
-
AFTER THE EVENT STARTS
-
AFTER THE EVENT BECOMES [status]
-
WHO IS USUALLY RESPONSIBLE FOR THIS: select from the list of users in your organization.
-
Click SAVE to commit the new item.
Continue adding as many items to the list as you'd like. You can also use the X to the right of an action item to remove it from the list.
To Change an Existing Master Action List:
-
Use the USER MENU (your login in the upper-right) and choose SETTINGS.
-
Click the ACTION LIST tab.
-
Find the Action List you want to change in the list of names along the left side of the screen and click it.
-
With the list selected:
-
Change the name of the list where it displayed above the items.
-
Click the DELETE button above the items to completely remove the Action List.
-
Click one of the action items on the right to change it.
-
Click the X to the right of one of the action items to remove it.
-
Click the ADD ITEM button to create a new action item on the list.
IMPORTANT NOTE
: Changes to Master Action Lists only affect new applications of the list to an event. No past events that use the updated list will be changed in any way unless the list is re-applied to the event (as when the event status or date changes).
Related Articles
Working With Lead Events in EventCX
PRESENTERS EventCX automates the process of taking your engagements from hold to sold and beyond. It can also help out with events you're trying to get, which we refer to as lead events. An important note: EventCX is an event manager, not a customer ...Managing the choices in an EventCX dropdown list
There are a few places in EventCX that present you with a dropdown list of choices. For example, the CODE field on a SERVICE or PRODUCT, or the PRESENTATION TITLE. This article will explain how to add or remove choices from these lists. Note that ...Manage Event Travel in EventCX
PRESENTERS Travel logistics are a big part of a speaker's life and calendar, and EventCX allows you to track all event-related travel. Managing your travel plans in EventCX offer many advantages: Easy access for all staff Travel plans tied right to ...Export contacts from EventCX
Want to get a list of your event contacts from EventCX so that you can use them in a CRM, email blast, etc? The CONTACTS EXPORT report will do the job. Even though it's a "report", it produces a downloadable CSV or VCF file that you can open with a ...Put a New Event on Your EventCX Booking Calendar
PRESENTERS Your eSpeakers booking calendar is the center of your business. For a professional speaker, trainer or coach, your calendar is your inventory and it should be accurate all the time. Your eSpeakers calendar should have every date that ...